Batching
- 08 Jan 2025
- 9 Minutes to read
- Print
- DarkLight
Batching
- Updated on 08 Jan 2025
- 9 Minutes to read
- Print
- DarkLight
Article summary
Did you find this summary helpful?
Thank you for your feedback!
2024 1098 and 1099 Forms Now Available for Batching
You can also generate 2024 1098/99 forms individually via the contact's Documents tab.
To access Batching within Bryt, navigate using the menu bar at the top of the webpage and click on 'Reports'. Then click on 'Batching' on the left-hand side's list of reporting tools.

From here you will see some linked options:
- 1098 Tax Report Batching -Tax report form itemized with interest paid per loan(separate form for each loan) and ordered by borrower name, includes a Mortgage Insurance Premium option (If you have the Impound module - click here to learn how to enable this) and the option to include lender fees as paid interest (if you have the lender fees module - click here to learn how to enable this).
- Batch 1098 Email Notification - this serves as a manual trigger for a notice (under Admin - Notices) titled '1098 Available' to manually alert your borrowers to the availability of their 1098 forms via email, which would be downloadable via their borrower portal (permitted they've already registered for a borrower portal account).
- 1099 Tax Report Batching -Tax report form itemized with interest received per loan (separate form for each loan) and ordered by investor/lender name, includes the option to include lender fee investor payout portions as paid interest (if you have the lender fees module - click here to learn how to enable this).
- Batch Download Generated Notices as PDFs - Batch downloads (PDF files) notices for all active loans and respective details based on the selected notice type. Notices must have already been generated by system event triggers (notices cannot be manually triggered after a system event trigger has passed). The main use for this is to print and mail out individual notices to borrowers.
- Batch Download Generated Documents as PDFs - Batch downloads (PDF files) generated documents for loans which triggered the automated document template. Documents must have already been generated for active loans to be available for download.
Requirements for Generating 1098/1099 Tax Reports
Bryt allows for Tax Reports to be batch-generated and downloaded for all loans based on the primary borrower's or Investor's (Lender's) loans and inserts the generated 1098/1099 forms into the Documents tab for a given contact as a PDF file.
Requirements:
- Contacts must have a tax ID (SSN, EIN, or ITIN), an address, and a City/State/Zip. Also, you as the lender must have an address and Tax ID assigned under your company details to properly generate a 1098/1099 form.
- 1098s: Must have paid interest AND be the primary borrower within a given tax year (Tax forms only include the primary borrower - it's a one-to-one mapping based on an SSN/EIN/ITIN - having the form generated for additional borrowers is not possible at this time.)
Example: To generate a 2023 1098 form for a borrower, they must have made an interest payment with a paid-on date within the 2023 tax year.
- 1099s: Must have been a participating investor/lender on loan(s) in the given tax year and received interest payouts.
Batch Generating and Batch Downloading 1098s/1099s (Same process for 1098s and 1099s - for the sake of redundancy we will cover the process by Batching 1098s in the rest of this section.)
If there is missing information the buttons to generate reports won't work (the buttons also won't be visible - I can see them since I'm an Admin user, which is why they're in the screenshot below), and are prompted a warning that those borrowers' forms will be skipped and not generated or downloaded. You can check what information is missing by viewing the 'Missing Information' Column and using the 'View Contact' button to update their information. 
Upon clicking the '1098 Tax Report for 2022' link, you'll see the following button options:
- Export to Excel - This allows you to download an Excel file with the 1098 report information as a spreadsheet similar to the view within Bryt (Not an actual 1098 form)
- Batch Generate 1098s - Generates 1098s per loan's primary borrower and is listed on each contact's 'Documents' tab on the left-hand side list. (Accessible by 'Contacts' in the Menu Bar, then selecting the borrower. Or the 'ViewContact' button.)
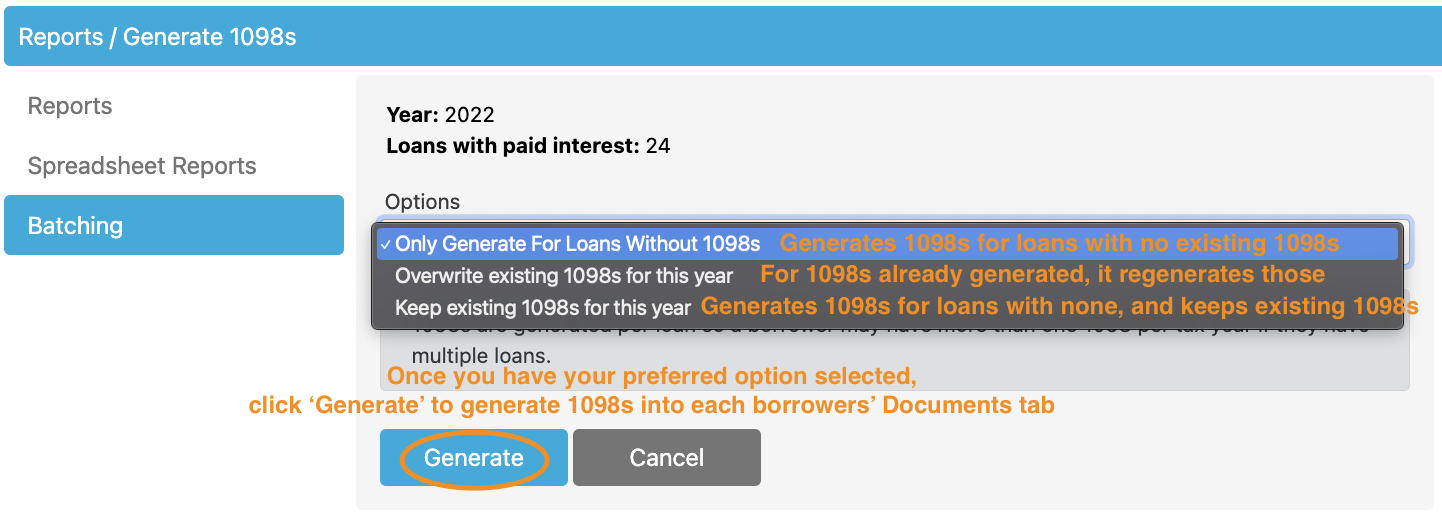 Note: The option to Overwrite is recommended since it'll regenerate data for existing tax forms. Otherwise, use the other options if those apply to your use case better.
- Batch Download 1098s - Generates and Downloads a PDF file per loan's primary borrower if they've paid interest in the given tax year.
- To Batch Download, you'll need to have existing 1098 forms generated for it to download those 1098 forms.
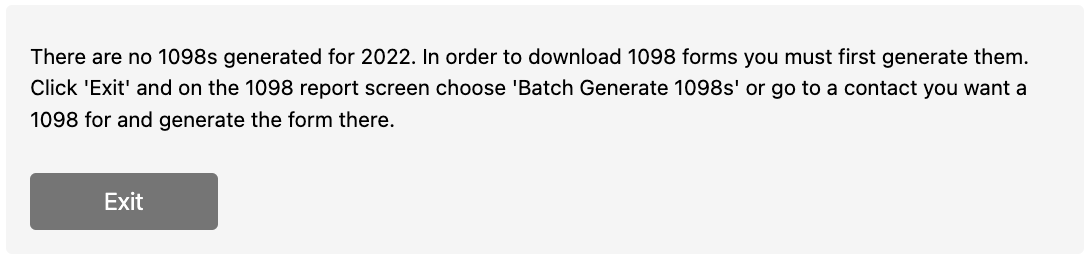 Once all the requirements are met, you will see a Download button and a notice stating the number of 1098s that met the requirement for download (and if more than one 1098 form exists, it'll use the most recent one for the download.)
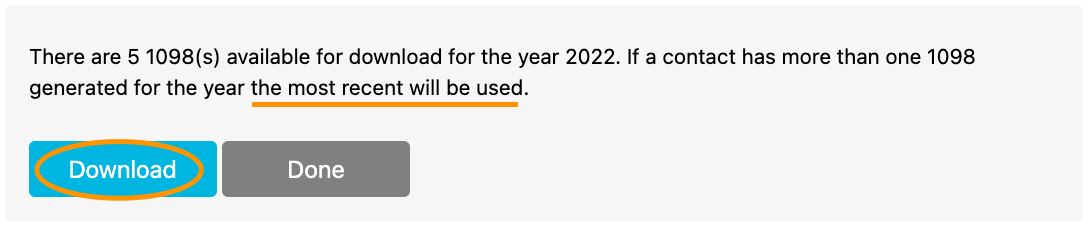 After clicking the 'Download' button you'll see a PDF file that's downloaded to your computer. Once you're done, you can click the 'Done' button to exit this screen.
- To Batch Download, you'll need to have existing 1098 forms generated for it to download those 1098 forms.
- Generate Fire File - To generate the Filing Information Returns Electronically (FIRE) File, you'll need to ensure you've entered all your information on the Company Details portion of your account and enter your IRS Transmit Control Code there. If you click the button and no file is downloaded then there will be a message prompting a list of errors and letting you know what's missing. Scroll down to the section titled 'Generating a FIRE File' in this article to see the full process of generating your FIRE File.
- Print 1098s - This option allows you to print onto 1098 Copy A (Red) forms. The button will download a paginated (each page is a separate loan) .pdf file to then print 1098 Copy A form data. You'll first need to Batch Generate the forms by using the 'Batch Generate 1098s' button.
Note: This option only applies to entities who are sending less than 10 forms to the IRS. Once you need to file 10 forms, you're required to electronically file for the given tax year (this requirement started with 2023 forms).UpdateYou'll click the 'Print' button to download a .pdf file to then print onto your 1098 forms.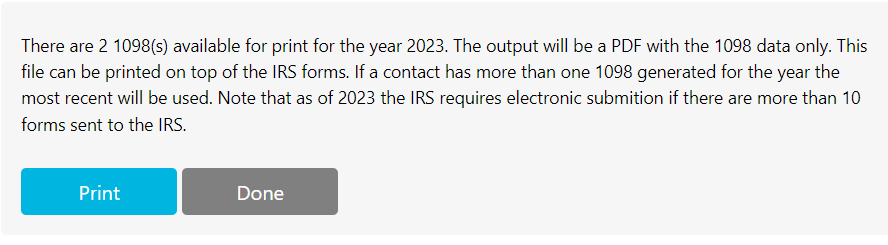 Result:
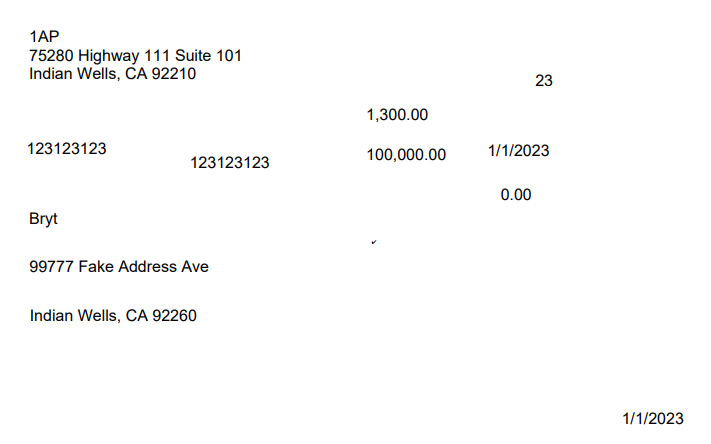
 Note: The option to Overwrite is recommended since it'll regenerate data for existing tax forms. Otherwise, use the other options if those apply to your use case better.
  Once all the requirements are met, you will see a Download button and a notice stating the number of 1098s that met the requirement for download (and if more than one 1098 form exists, it'll use the most recent one for the download.)
 After clicking the 'Download' button you'll see a PDF file that's downloaded to your computer. Once you're done, you can click the 'Done' button to exit this screen.
 Result:
Now when you click on Reports and go to Tax Reports there will be a list of users who have paid interest on a loan, which is separated by loan name and shows the amount of interest paid on that loan. You will be able to view each individual contact by clicking the 'View Contact' button on the 'Options' column.

Once you click on the 'View Contact' button you will be directed to the borrower's contact details page, where you can navigate to the 'Documents' tab on the list from the left-hand side to see the generated 1098 forms.
Alternatively, you could Generate a 1098/1099 form individually for each contact (and all of their associated loans) as long as they have the required details (Lender's Address, Lender's TIN, Borrower's Tax ID Type Number, Borrower's name, and Borrower's Address). You can click on the 'Del' button to delete the generated tax form, in case you want to generate a new one with new data.
Now you would click on the 'Pdf' button to download a pdf file of the IRS 1098 Tax Report form.
The 'Send' button will prompt a dialog box to send that specific form to a borrower via their email.
The IRS 1098 Tax Report Form

If you'd like to include an amount for the Mortgage insurance premium (MIP) box (Box 5 in the image above), you'll need to have the Impound module and follow the Impound guide to include those MIP amounts within that box.
To include Lender Fees as part of the Interest paid/received (Box 1 in the image above) by your borrowers/lenders, follow this guide.
This concludes the guide to generate 1098/1099 forms via the Batching feature. You may choose to generate these forms individually for your borrower/lender via the Contact - Documents tab.
Batch Downloading Notices (PDFs)
To batch download a notice, make sure the notice you'd like to batch generate is set to Active.
Note
The ability to batch download notices will not work until the notice has been generated (triggered).
To set a notice to active, go to the Notices page by clicking on the Admin tab, then clicking on Notices on the left-hand side list.
From there click the Edit button on the desired batching notice. Once in the edit interface settings for the selected notice, set the 'Do you want to make this notice Active?' settings to Yes.
Finish by clicking on the Save Changes button.
Now you'll want to navigate to the Reports tab, then click on Batching on the left-hand side list.
From there you'll want to click on the 'Download batched notices as PDFs' link (as shown on the first image on this web page).
After that, you'll be at the Batch Download Notice Options page. From here you'll be able to select the Notice Type you wish to batch download, it will only show the notice types that you set to active from the previous step.
Select your desired notice type to batch download and then select the From and To dates. 
 Then navigate to your downloads folder to open and view the PDF file that was generated for you.
Once you're finished downloading batched notices, you can click on the Done button to return to the previous screen.
Batch Downloading Documents (PDFs)
To ensure this process works correctly, follow the Document Automation guide and make sure there are documents that have been generated for loans already. Otherwise, it won't download any documents if none have been generated.
Once documents have been generated, navigate to the 'Download batched document PDFs' link (shown in the first image of this guide).
Click the link and you'll be prompted with the following options:
- DocumentType - Select the document template type you'll want to batch download PDF files for.
- DocumentsGenerated From This Date or After - Sets a date for the system to look at the selected generated document type between this date as a 'From' date. (Greater than or equal to >= Selected Date)
- Documents Generated From This Date or Prior - Sets a date for the system to look at the selected generated document type between this date as a 'To' date. (Less than or equal to <= Selected Date)

Once you're done there, click on the 'Download' button.
From there you should see a downloaded PDF file prompted (just like the Notices download above this Documents section) with all generated documents. In our example, we have the 'PayoffStatementDetailed.docx' set to 'When a Loan is Created' trigger.

Once you're finished downloading batched documents, you can click on the Done button to return to the previous screen.
Generating a FIRE File
This section will cover the process of generating a FIRE file as it works in Bryt. If you'd like to learn more about FIRE Files, please follow this link to be taken to the IRS page. Alternatively, here is the IRS website to create a FIRE Production System account. If you have IRS-related questions we ask you to reach out to them about their process and requirements for the best answers.
To get started, you'll want to ensure all of the Company Details are filled out under your Admin tab. If any fields are missing, there will be a list of errors prompted when clicking the 'Generate Fire File' button.
Example:

After you go to your company details and enter the missing information, you'll go back to Reports - Batching and select the link to '1098 Tax Report for 2023'.
Once all of the information requirements have been met, you'll no longer see a list of errors when clicking the 'Generate Fire File' button - instead, you'll immediately see a .txt file downloaded to your PC locally.
Go to your downloads folder and open the text file, it'll be generated like in the image below:

This concludes the process of generating a FIRE file to submit to the IRS.
Please contact Bryt support if you encounter any issues throughout this process. We appreciate any quirks that are reported to us.