Borrower Portal
- 20 Feb 2025
- 10 Minutes to read
- Print
- DarkLight
Borrower Portal
- Updated on 20 Feb 2025
- 10 Minutes to read
- Print
- DarkLight
Article summary
Did you find this summary helpful?
Thank you for your feedback!
Add-On Feature
This feature is an add-on module and is only available if you have purchased this module. Contact Bryt support(support@brytsoftware.com) to learn more about accessing this module.
The Borrower Portal is an add-on feature that enables borrowers to make payments, view their payment history, view their portal account settings, and view the personal information that the servicer stores for them under their Bryt contact record. The account settings module allows the portal user tochange their username (email) for their portal account (allows updating the borrower's email on the servicer's Bryt contact details).
If you also purchased the Investor Portal module, when you navigate to 'Admin - Portal Setup' you'll be asked to select which portal you want to set up. This guide will only cover the Borrower Portal but the process is similar for both.

Note: Each portal (Borrower/Investor) will have different domains and are separate. If a contact in your system is also a borrower, this is allowed since they are separate domains and the same individual contact's email (one contact record) can be used.
Testing the Portal and Portal Invitations
If you'd like to test these features as you go through this guide and see things from the borrower's perspective, you'll want to create a test contact and test loan. Note that the contact will need a valid email, it cannot be the same email as your 'Admin - Email Settings' 'From' email address (which you will also need to send the portal invitation via email successfully). You may choose to temporarily remove the BCC address (if you use one) and use it for the contact's email while you test.
To invite borrowers to register for their portal account (or yourself for testing), you'll want to navigate to the contact's record, then click the 'Portal' tab on the left-hand list (Contact - Portal Guide). Once you're there, there will be a blue link for you to click and send the borrower their borrower portal registration email invitation (if you've also purchased the investor portal module, you'll see blue invitation links for both portal options), the email will include all necessary information to register. If you'd like to be guided through that process, please refer to this Borrower's Registration Perspective guide. 
Note: Portal registration invitations will expire after 48 hours.
If you have multiple contacts with the same email, you should only send one portal registration invitation. There is a section later in this guide titled 'Multiple Contacts with the same Email' that explains this in additional detail.
Configuring the Borrower Portal
To get started, you'll want to go to Admin - Portal Setup, and select 'Borrower Portal' (if asked).
From here you'll be able to edit the borrower portal settings to change the borrower's portal view:

Borrower Portal Title and 'Show Title on Portal' Checkbox - Sets the portal's title and is shown once the user signs if you've checked the 'Show Title on Portal' checkbox.
- Note: The title entered in this field will be added as a prefix on the borrower portal's landing page. For example, if you enter 'MyCompany Portal', it'll show as 'MyCompany Portal Login', once the user logs in, the title will only show 'MyCompany Portal' as entered in this field.
Show Logo on Portal - This option will use the same logo as your company logo as uploaded via 'Admin - Company Details'.
Require Borrower Portal Users to use Two Factor Authentication - will force all borrower portal users to use two factor authentication.
Editing the Borrower Portal Subdomain - This is a requirement - a subdomain must be declared (Saved under Admin - Portal Setup) to activate and be able to test/use your portal - Example: yourcompany.brytsoftware.com
- Note: A custom URL can be configured for a fee. Ex: YourCompanyNamePortal.com (excludes mention of Bryt) - You can reference pricing via our Customizations page and look for the 'White-label Custom Domain' option.
Portal Support Text (Displays text below the borrower portal interface to inform the borrower of support information to use if needed.)
- Note for Advanced Users - The '(supports html)' means you can insert a link such as: "Feel free to look this up <a href="https://www.google.com/" target="_blank"> via Google</a>." - in this example, there will be a link for the 'via Google' text to open a new tab and take the user there.
Borrower Portal Button and Button Text Color - You can Google 'Hex Color Picker' to find a color and hex code (# with 6 numbers/letters) to copy and paste into these fields. Entering text like 'Blue' will generate errors.
Enable or Disable Borrower Portal Modules (Account settings, Personal Information, ACH Payments, and Payment History.)
Borrower Portal Modules
You'll click the 'Edit' button beside the module to enable/disable these module options. Modules that are not enabled will not show on the portal side.
Account Settings Module - For this, you have the check box to enable/disable the module. You can also change the Display Name for the module, so the button's text shows differently on the Borrower Portal end. The last option before clicking 'Save', is to allow the borrower to either change their username (email) for their portal account without updating your Bryt's contact details, while the last option does allow them to update the email you have saved for them.
Personal Information Module- This shows all the contact details stored in the servicer's contact record in Bryt for the investor. You only have a check box to enable/disable this module and a field to change the button's display text.
Loan Summary Module -Check the box to enable/disable the module and change the borrower's portal-end button display text if you'd like. Additionally, you have checkboxes to show/hide data such as a loan's rate, current balance, original loan amount, next due date, days late, closing date, payment frequency, remaining payments, and maturity date.

Ach Payments Module - Check the box to enable/disable the module and change the button's display text if you'd like here. You'll be able to set the number of days before a loan's due date that a borrower can submit a payment.

Documents Module -Check the box to enable/disable the module and change the button's display text if you'd like here. This module will allow borrowers to see their Documents, Files, and Taxes (1098 forms). This will be covered in further detail later in this guide.
Payment History -Check the box to enable/disable the module and change the button's display text if you'd like here. Allows the borrower to see their payment history for their loan(s) and see a breakdown of their payment for principal, interest, or late fees paid.
Borrower Portal Modules (Borrower's Perspective)
Once logged in, the borrower's home page will look like the following if all modules are enabled, if you've not enabled some modules then they will not appear for the borrower.
Home Page
Account Settings Module - This will show the portal user's username (email) and allow them to update their email if you've permitted them in the configuration step. If you select 'No' for this, they won't see the 'Change Username / Email' button when clicking this module. They would only be able to change their portal account password.
Personal Information Module - This shows the details you have stored for the contact record in Bryt (borrower in this case). 
Loan Summary Module - This section allows theborrower to select their loan(s) and view current loan details.

Make a Payment Module - Visit the ACH Module section of articles for details regarding payments and getting that set up for your borrowers. If you've enabled 'Recurring' for a loan, they will not be able to submit payment to you via their portal.
The borrower will be able to select their loan(s) (they may have more than one loan with you) and view the following image to submit payment for their dues.
The borrower can also add bank accounts or delete them if they need to delete a stored bank account.

Payment History Module - The borrower will be able to select their loan(s) and view the loan's payment history. Once viewing the payment history, the transactions listed under the 'Amount' column will be blue hyperlinks that take the borrower into a breakdown view of their payment. Note that the list of payments here will include manually recorded payments, it's not limited to payments submitted via the portal's ACH feature. 

Documents Module - This module allows borrowers to download 1) generated documents (including automated documents), 2) add files you've uploaded for the loan/contact (borrower), and 3) generate 1098 tax forms. Borrowers cannot upload documents/files via the portal at this time due to security reasons. These options comprise the three tabs available: Documents, Files, and Taxes.

1) Documents tab - There are two ways this works, you can set a document template (document templates module) to be visible to the borrower by default once it's generated (works with automated documents), orgenerate a document as a one-off and use the 'Portal' button (which overrides the global setting that you've designated in the first option).
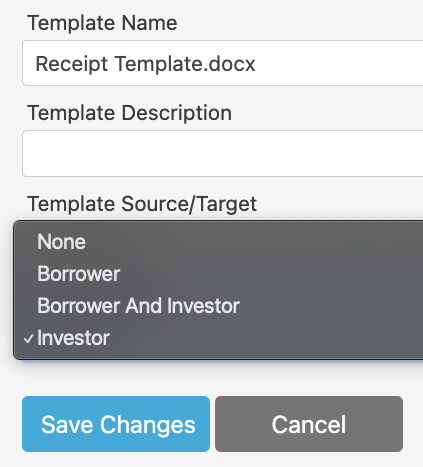
- Admin- DocumentTemplates: In the admin area for 'Document Templates', on a document template you've created and uploaded, you would click the 'Edit' button and look for the 'PortalVisibility' drop-down option. If you purchased both the borrower and investor portal, then you'll see four different options None, Borrower, Borrower and Investor, and Investor. Otherwise, only the portal option you've purchased will appear. With this option set, whenever this specific document template is generated they will automatically appear for the portal options you've selected.
- Portal Button - Document Generation: When you generate one of your document templates via a Loan's or Contact's Documents tab, you generate the document using the 'GenerateDocument' button. Once generated, it'll default to the template's settings as you've applied in the 'Admin - Document Templates' area (Step 1 here), which is reflected under the 'Portal Options' column. However, you can use the 'Portal' button (far right Options column) to override the document's visibility. Once the visibility option is set, the borrower will be able to download that document here by clicking the blue file name link.
Note: If you only purchased one portal module, clicking the 'Portal' button here will serve as a one-click 'Toggle' to show/hide the document for whichever portal you have enabled (borrower/investor portal). Basically, the image shown below with the checkbox for 'Override Global Setting' with its drop-down options wouldn't apply to you. Borrower's View:
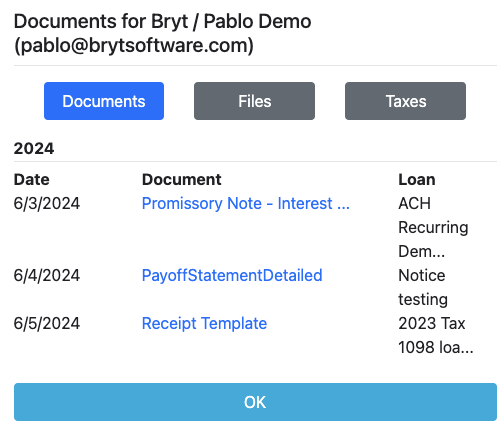

 Borrower's View:
2) Files tab - For this tab, you can upload files (Word, PDF, or Excel) via a Loan's or Contact's Documents tab using the 'Add File' button. Once uploaded, you'll use the 'Portal' button to choose if you'd like to expose that document to the borrower on their portal end. When they visit their portal, click on Documents, then click the 'Files' tab they would see the file and click the blue file name link to download that file.
Note: Similar to the Documents tab, if you only have one portal module,the 'Portal' button will serve as a 'toggle' button. If you have both the borrower and investor portal modules, you'll see four options for None, Borrower, Borrower and Investor, and Investor like in the image shown below.

Borrower's View:
3) Taxes tab - this tab stores generated 1098 tax forms that the borrower can download by clicking the blue 'Download' link. The borrower will need a loan with interest paid in the given tax year. If you'd like to learn more about the 1098 tax form generation process, please follow this guide.
Borrower's View:
Multiple Contacts with the same Email
If multiple contacts share the same email, once the borrower (contact) registers for their first portal, you as the lender/servicer can then save the same email, and the borrower on their portal end will see a new option appear on their home page.

This new option will allow the borrower to 'toggle' between different borrower (unique contact) sets of loans, documents, and files.
Note: If you also have the investor portal, you'll still need to have the contact register for an investor portal account. If the contacts are all borrowers, listing the same email for each of their contact records will reveal them as additional contact selection options.
Additional: Errors and Warnings
Recurring ACH Option: If you have Recurring Payments enabled on a loan your borrower will not be allowed to submit a payment to you via the Portal.
Investment module users - If you have not assigned an investor/lender on the loan, your borrower will also be unable to submit a payment to you.
That concludes the Borrower Portal guide. Please contact support@brytsoftware.com if you encounter any issues and we can help clarify parts of this guide. Thanks!