NACHA
- 12 May 2025
- 11 Minutes to read
- Print
- DarkLight
NACHA
- Updated on 12 May 2025
- 11 Minutes to read
- Print
- DarkLight
Article summary
Did you find this summary helpful?
Thank you for your feedback!
This is an optional add-on module for clients looking to generate NACHA files as a way to draw funds from the borrower's bank account and generate NACHA files for payouts.
If you'd like this module enabled on your account, please submit your request to support@brytsoftware.com so we can get you set up and possibly schedule Zoom time to go over any questions you may have.
Note
Before starting this guide, we recommend generating a NACHA file for only a couple of loan payments at a time to ensure the formatting for your particular banking institution is acceptable. This way if you look to regenerate a NACHA after an upload error due to file discrepancies it will help prevent you from having you delete the recorded payments for all loans on the batched NACHA file.
Contacts - Contact Details
Once this module is enabled, you'll be able to enter and store a borrower's bank information by going to their contact details.

Bank Name - A name to describe the bank account, such as Borrower's Checking or Borrower's Bank of America Savings.
Bank Account Number - The 8-12 digit number for the bank account. This can be found on a borrower's check.
Bank Routing Number - A 9-digit bank-specific routing number. This can also be found on a borrower's check.
Account Type - Borrower's bank account type, whether checking or savings.
ACH Transaction Type - The options are Personal (PPD) or Business (CCD), this denotes whether it's a personal or business/corporate transaction. If it's a PPD type the borrower would be backed by their bank for 30 days, while CCD only allows a dispute for 48 hours. However, some lenders prefer one over another and some banks will prompt an error while others will accept either type.
Make This the Default Account for This Contact - Designates which bank account (among many possible accounts stored) for this contact will be used for the NACHA file.
 Now that you have an account added you'll see it in the contact's Bank Accounts list. From there you'll be able to either 'Edit' if you'd like to change information switch the default account or delete it by using the 'Del' button.
Note: If you also have the ACH module, you'll see a 'Source' column after the first 'Bank' column noting whether it's related to NACHA or ACHQ. Refer to the 'Contact - Bank Accounts' guide for more information.
Admin - NACHA Settings
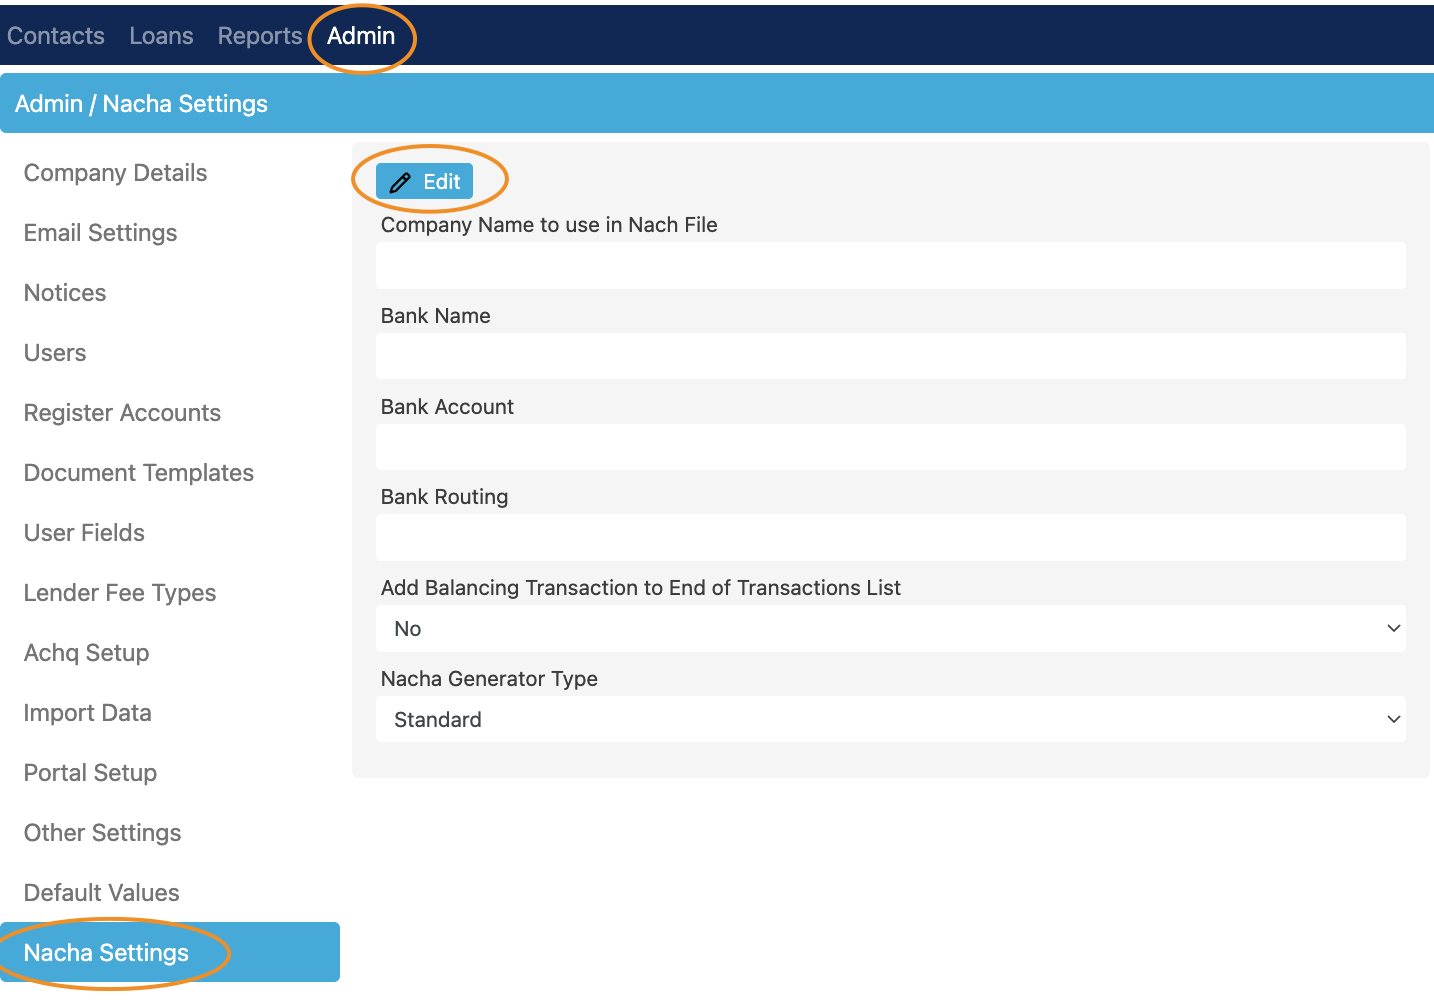


Company Name to use in NACHA File - This may be the same as the Company Name you have set under your Bryt Company Details, but sometimes people have a different organization name for their bank. Example: Bryt Investment Group, LLC.
Bank Name - This is the name of the banking institution you have an account with. Examples: Bank of America, Chase, Wells Fargo, etc.
Bank Account - 8-12 digit number for the bank account.
Bank Routing - 9-digit routing number for the bank account.
*Add Balancing Transaction to End of Transactions List - This option will list a balancing transaction to the NACHA file's list of transactions if the specific institution you work with will require it. By default, it's set to no but this varies between banking institutions' NACHA requirements.
Exclude Servicer Payouts from NACHA Files - This option allows you to exclude Servicer Payouts from being included in the generated NACHA file.
*NACHA Generator Type - For now, there's only one NACHA generator type but if your banking institution requires something different, we ask that you submit a request to support@brytsoftware.com.
*Please Note: Most banking institutions look for something different from what is considered an "Acceptable" or "Standard" NACHA file. Some banking institutions won't return any error information when attempting to submit a NACHA file. If they do return error information, send us an email to get that working for you.
If not, you'll need to contact your banking institution and request to speak with a technical team member or ask to be directed to someone who handles NACHA files, then ask for what's required or request a sample NACHA file. If you'd like, ask for an email or contact number for this institution's "NACHA Person" and provide that to support@brytsoftware.com. Once you have that information, our development team will be able to figure out what's an 'Acceptable' NACHA file for that specific institution and have that NACHA generation type available under the Admin - NACHA Settings tab.
Additional Examples: Some banks want all lowercase, UPPERCASE, or Camel Case bank names on the NACHA file.
Admin - Other Settings (This option should only appear for Investment module users.)
There's an option in Admin - Other Settings to set a specific number of days before the funds are made available to be used for investor payouts.
Admin - Company Details
To be able to generate a NACHA file you'll also need to ensure you have a Company Tax ID set under Company Details on the Admin Area.

Generating NACHA Files
As a brief note, the two ways that NACHA files are generated in Bryt are by using the 'Due Payments' widget and the 'Ready Payouts' widget. Due Payments handles the NACHA file generation process for Payins, while the Ready Payouts widget handles the NACHA file generation process for Payouts (Servicer/Investors). Depending on the contacts' bank account types selected (PPD or CCD), if both bank types are included among the selected Payins/Payouts two files would be generated - one for PPD and another for CCD.
Once all the setup work is done, you'll be able to start generating NACHA files for Payins and Payouts.
Payouts: If you have the investments module, payments collected via ACH and manually recorded payments (recorded outside of the Due Payments Widget) will both create entries under the 'Ready Payouts' widget (located at the bottom of the Dashboard). You'll want to keep in mind that if paid amounts aren't settled and an ACH payment is unsuccessful, you'll be sending out money while possibly going negative. If you don't have the investments module, the Ready Payouts widget will not work since the system looks at journal entries for servicer/investor payouts.
Payins: If you'd like to generate a NACHA file for Payins (the ACH module itself takes care of Payins), you'll want to continue this guide by using the 'Due Payments' Widget outlined below.
Due Payments Widget (Generates a NACHA file for Payins)
To do this, you'll want to go to your Dashboard, scroll all the way down to the 'Due Payments' Widget, and click the 'View All' button.
Once there, you'll be able to see loans with their associated due dates. You'll want to click on one, or many by simultaneously pressing the CMD/Command Key on Mac (or CTRL key on Windows) and selecting all loans you'd like to 'Make Selected Payments' for. Otherwise, you can use the 'Make All Current Payments' button to make the payment shown under the Due On column for each loan. Note: If a loan's Currently Due value is 'No', they won't be counted in the NACHA file generation.
Here we see that the two selected loans in the prior screenshot are reflected after clicking the 'Make Selected Payments' button. If the information all look good, click the 'Make Payments' button (DO NOT click away after this as it'll start a process to record each of those payments one by one.).
Once that is done and there are no errors when recording payments, you'll want to click the 'Done' button to finish this process. If successful, you can navigate to each loan's schedule where you'll see the payments have been applied.
Locating the Generated NACHA File(s)
Reports - NACHA Files
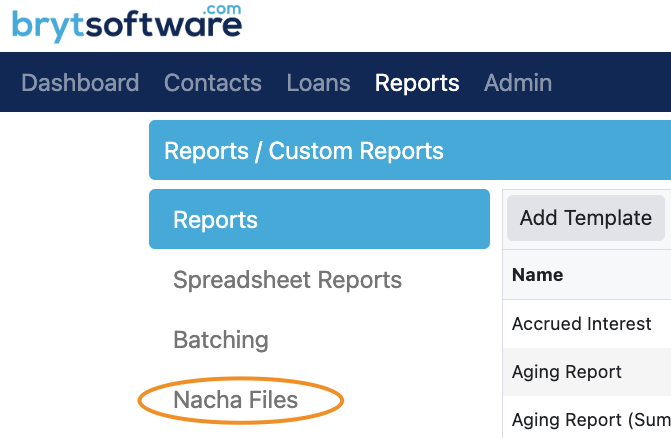

After completing the previous step by recording payments, you'll see a generated NACHA file under Reports - NACHA Files. You'll see the NACHA's creation date, the selected Payment Date for the loans in the file, the auto-generated file name of this NACHA file, and finally the 'Download' button.

Upon clicking the download button the NACHA file will be downloaded locally to your computer.
Once opening the file in your text editor, you'll see the following (627 is incoming while 622 would reflect outgoing funds):
Since I elected for a balancing transaction, you'll see the final transaction (line 5) balances out the paid amounts for the two loans above it on lines 4 and 3.
As mentioned previously in the article under the "Admin - NACHA Settings" section, if this generated NACHA prompts an error when attempting to upload it to your bank, you'll need to request additional information from your banking institution. Please reference that Admin - NACHA Settings section for potential errors and what steps to take for us to help get you the right formatting.
Ready Payouts (Payouts) Widget
To make payouts and generate NACHA files, you'll want to navigate to the Dashboard. Once there, you'll want to scroll down to the bottom and find the 'Ready Payouts' widget, then click the 'View All' button.


Make All Ready Payouts - This button is used when you'd like to include every listed NACHA Payout entry in the NACHA file you'll generate.
Make Selected Payouts - Otherwise, you can single out desired ready NACHA payout entries by holding the ALT (Windows) or CMD (MacOS) key. Once all the desired payout entries are selected, you can use the 'Make Selected Payouts' button for the NACHA file.
Clear Selected Payouts - This button is used to clear redundant or unnecessary entries you don't plan on ever including in a NACHA file. For example, 'Servicer Payout' entries are typically going to sit with the servicer instead of being paid out. Clearing the selected payouts cannot be undone, you would need to re-record payments for your loan to make them available again.
Note: If you'd like to exclude all servicing payouts by default - you'll want to go to Admin --> NACHA settings and select 'Yes' for the 'Exclude Servicer Payouts From NACHA Files' option. This way you can simply click the 'Make All Ready Payouts' button and have those excluded in the NACHA file generation process.
Working Example
You'll either want to click on the 'Make All Ready Payouts' button to generate a NACHA file for all shown entries in the list OR select the payouts you'd like to make.
Once those are selected you'll want to click the 'Make Selected Payouts' button to only payout those selected items (NACHA file generated for only those selected items).
 After clicking the button, you'll be taken to the screen below with a yellow warning dialog box if there's an error.
 You'll want to address any of the noted errors before being able to generate a file.
After issues are addressed, you'll select a Posting Date for the NACHA file.
Note: Some banks may require you to select a day in the future to successfully process a NACHA file.

If everything is good and no errors are found then you'll be able to click the 'Make Payouts' button (as shown above) to generate a NACHA file.
From there, you'll be redirected to the Nacha Files section under Reports where you'll be able to download that NACHA file (shown in the image below).

NACHA Files Options Buttons
Un-Process - Allows you to back out a generated NACHA file's processed payout entries to adjust missing or extra payouts you'd like to include. Can also be used to adjust the NACHA File's Post Date. Upon Un-Processing, the entries will be made available again under the Ready Payouts widget.
Regen - This button only applies to changes made under your 'Admin - Company Details' area of the system which may need to be updated if your banking portal rejects the NACHA file upload attempt. The button would regenerate the same file of payout entries with the only changes applying to updates for the servicer's company details.
Note: If you need to make changes to a borrower/investor's bank account details or a recorded payment, you'll need to re-record the payment (after the borrower/lender's bank account information has been changed) on the loan to create a new NACHA Ready Payout entries with correct information. Since the payment needs to be deleted, if it's been made via ACH, please submit an ACH payment deletion request to support@brytsoftware.com. Otherwise, you can use the 'Un-Process' button to change the NACHA file's Post Date and/or back out a NACHA file with missing or extra payout entries you'd like to adjust.
Download - Downloads a .txt file, which is what you'll attempt to upload to your bank's portal.
Once downloaded and opened you'll have the following (627 is incoming while 622 would reflect outgoing funds):
 NACHA Prefixes for reference -
Outbound: 622 for a Checking account, and 632 for a Savings account
Inbound: 627 for Checking, and 637 for Savings
Note: If the Payout Target accounts are intermixed with PPD or CCD then two separate NACHA files will be generated for each type.
How do I Regenerate a NACHA file for changes to payments or borrower/investor bank details?
Once a NACHA file has been generated by working through the steps in this guide you'll need to:
(1) go back and delete all applied payments (to all loans that payments were applied to) and then
(2) edit borrower information if needed to regenerate the NACHA file.
Otherwise, if you're savvy with NACHA files, you can edit the text on the NACHA itself by knowing where to change the digits and saving the edited NACHA .txt file. Upon editing borrower information and re-recording payments (make sure to edit borrower information first if edits to their bank info are needed, then record payments to ensure the updates stick to the new NACHA file), you'll want to follow the steps outlined in this guide to create a NACHA file via the Ready NACHA Payouts widget.
This NACHA guide article has an attached NACHA Example (Excel File - located below this paragraph) to help reference what numbers correlate to what areas.
Please submit any errors or questions to support@brytsoftware.com to verify any issues or best address your concerns. Please make sure to include as many details as possible, screenshots help. Thanks!