Recurring Payment Option
- 10 Jul 2024
- 8 Minutes to read
- Print
- DarkLight
Recurring Payment Option
- Updated on 10 Jul 2024
- 8 Minutes to read
- Print
- DarkLight
Article summary
Did you find this summary helpful?
Thank you for your feedback!
Note
Recurring Payment does not mean Automatic/Automated Payments, manual input by the servicer is still required to initiate the ACH process.
This feature is specifically used to help lenders consolidate their expected upcoming payments across all loans - to better identify dues to be collected via ACH.
To collect and process payments as a servicer (yourself), you'll still need to oversee transactions and initiate them manually by:
1) clicking 'Schedule with ACHQ' either via the Dashboard's Recurring Payments widget for relevant loans or
2) by going to an individual loan's ACH tab.
Otherwise, the borrower would initiate payment via a Notices 'payment link' variable, or the borrower portal if you have paid for that add-on module.
The ACH Module offers the option to set up loans for recurring collection of payments. To use this feature, you must have completed the ACHQ application for Merchant ID step.
Set Up Recurring Payments
The Recurring Payments option is set up on a loan-by-loan basis, meaning some loans can have this option enabled, while others don't. For example, some servicers will enable recurring to manage the scheduling of payments on behalf of some borrowers, while the servicer may allow other borrowers to schedule payments themselves via a payment link notice variable, or the borrower portal. While Recurring is enabled for a loan, the borrower cannot submit a payment to you via the payment link or portal.
- To set up recurring payments for a loan, you will need to go to the loan's Summary page.
Alternatively, you can search for the loan using the Global Search bar.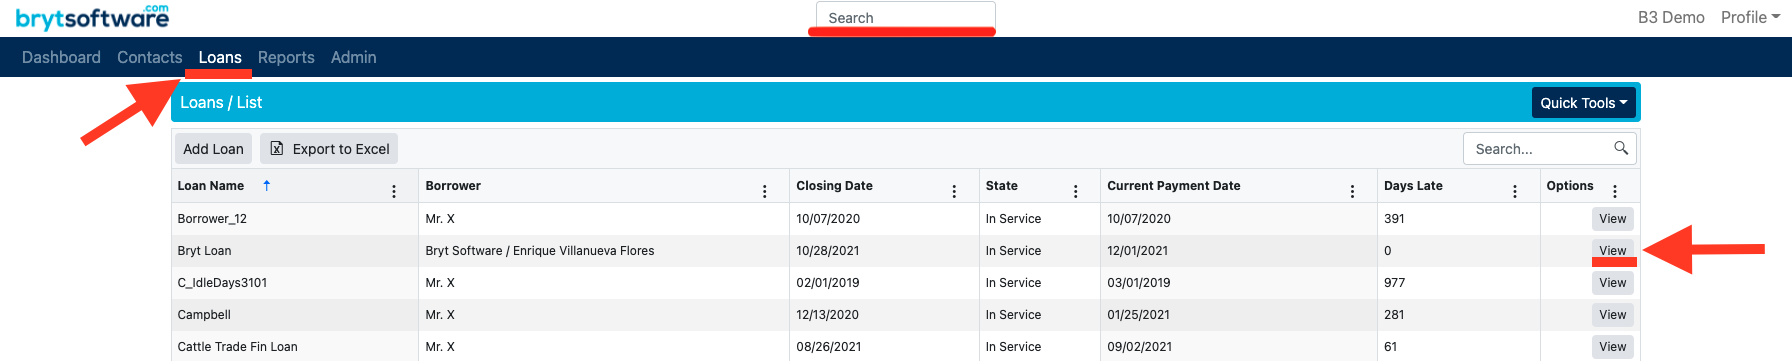
- From the loan's summary page, select the "ACH" tab from the list of menu items on the left-hand side of the screen.
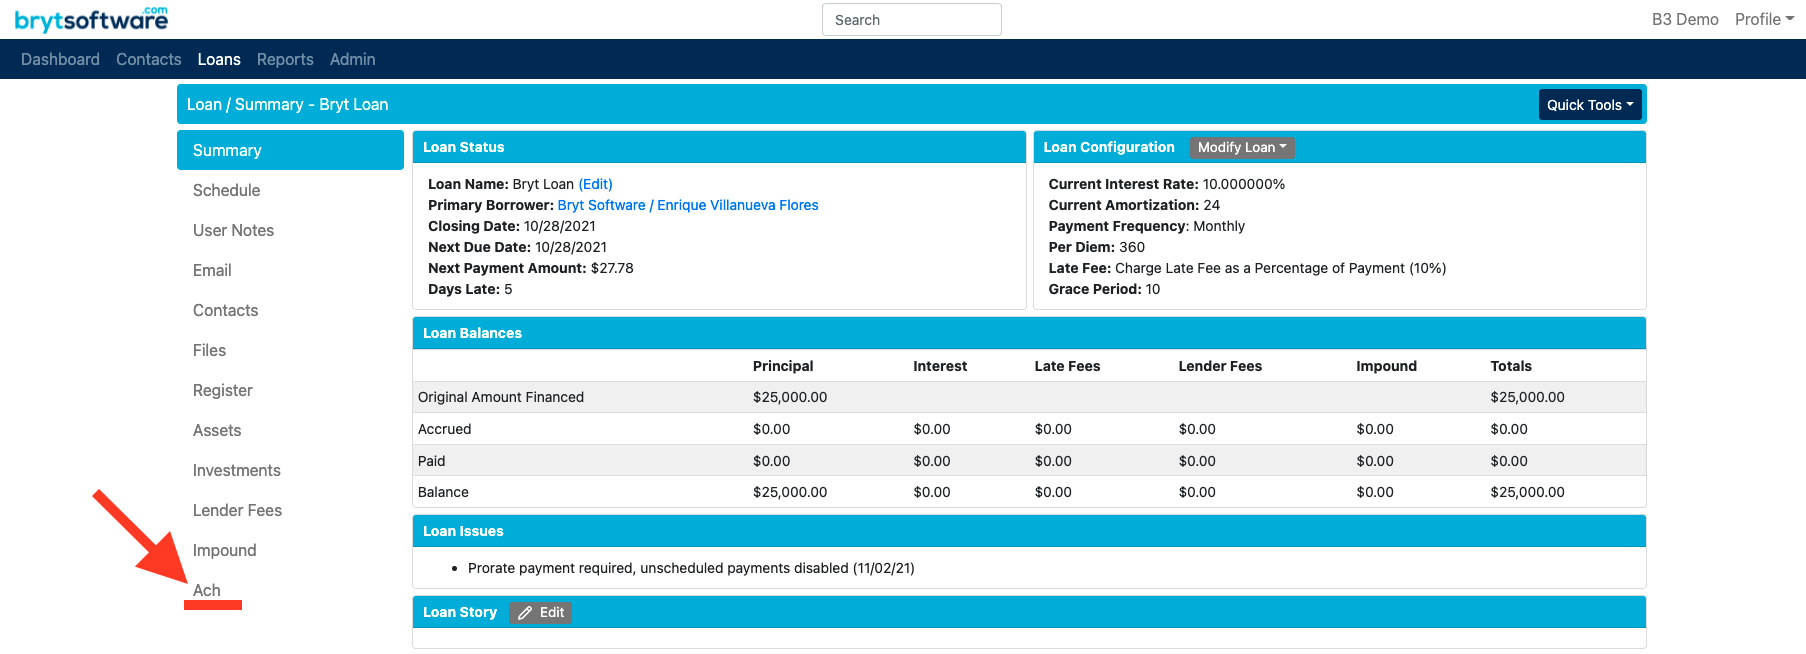
Note: If you have not completed the ACHQ sign-up process, you will see the following message.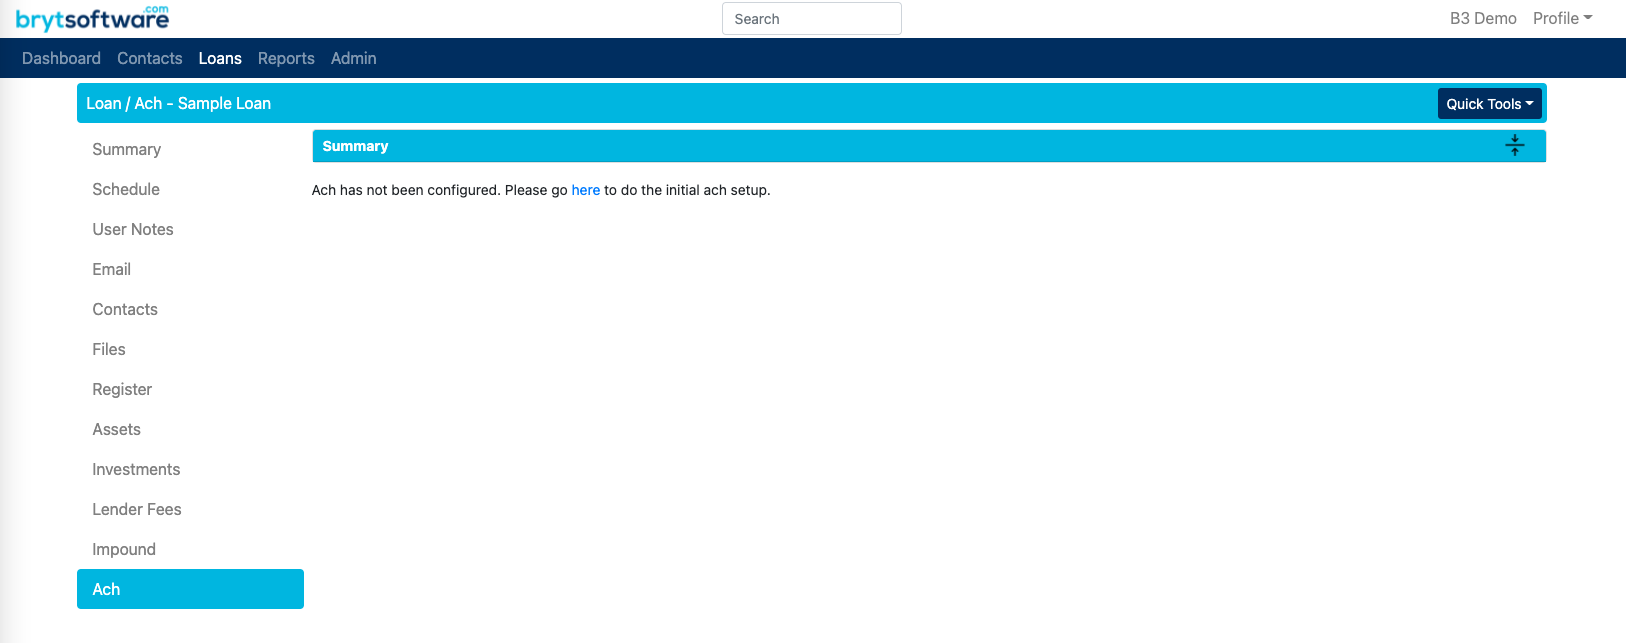 If this is the case, click the "here" hyperlink which redirects you to the ACH setup page under the Admin options. Follow the steps provided in Application for Merchant ID to complete the merchant sign-up process.
 - From the Loan's Ach page, you will notice you have some options to choose from. To set up recurring payments, select the "Setup Recurring Payments" button.
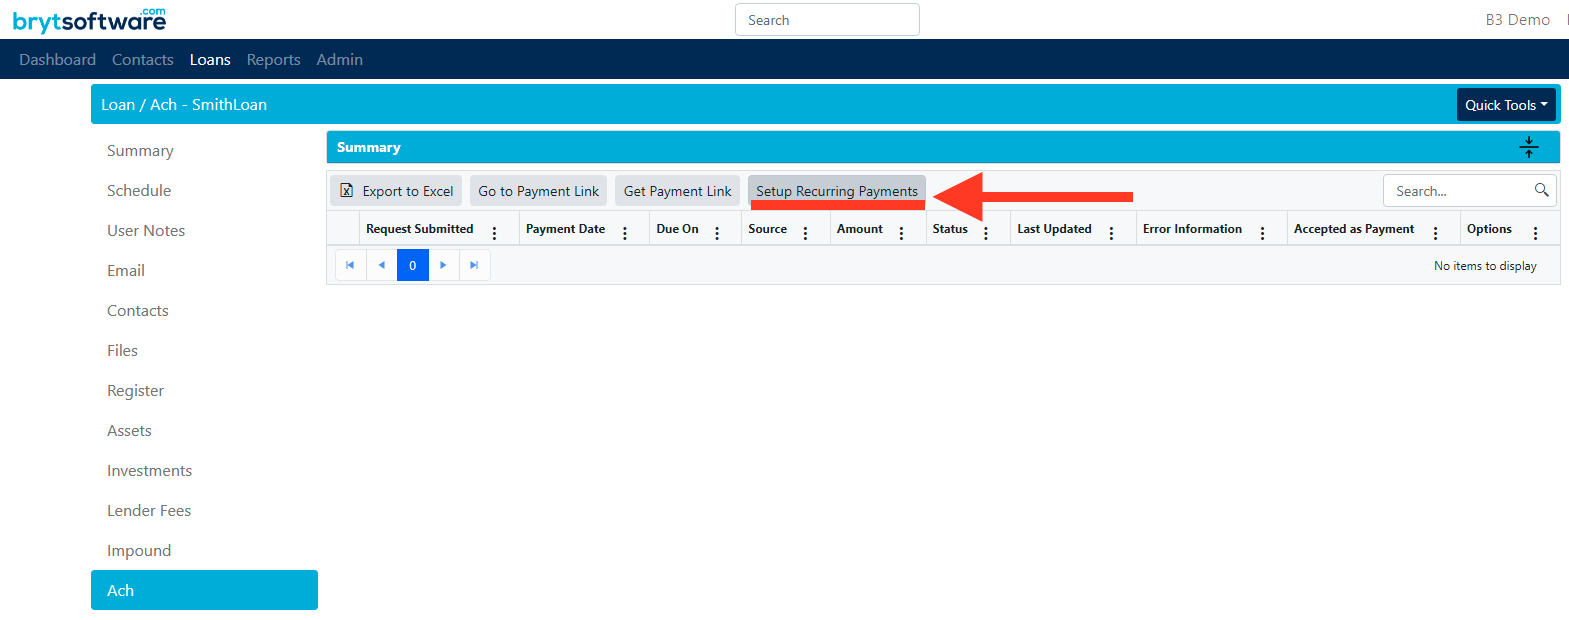
The borrower's address information must be populated before continuing the setup process. If there is any missing information, you will be prompted to enter the missing values for the contact. Click the "here" hyperlink to enter the missing values of the associated borrower.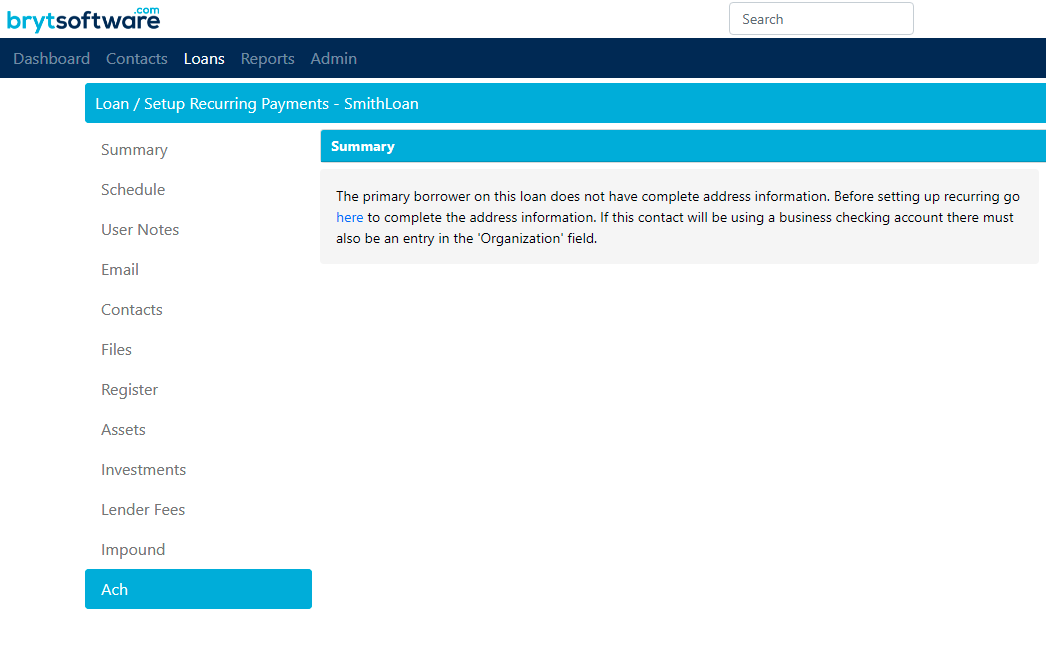 Note: Business checking accounts must include an Organization value.
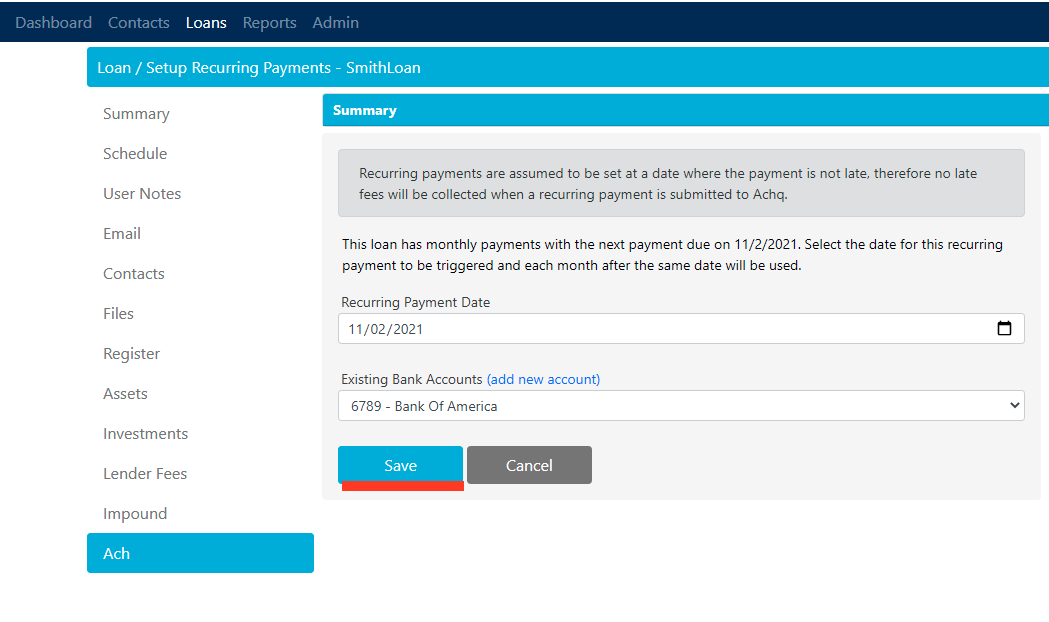
 - You will be prompted to set the Recurring Payment Date and select the borrower's Bank Account in the recurring payment form (more information for step 4 at the end of this article, under the 'Additional Information' section).
If no bank accounts have been entered previously for this borrower (contact), or you want to add a new account, you will be asked to provide banking information.
Note: If the entered bank account or routing numbers are invalid, then it will not take those numbers. If the borrower or you ever accidentally enter incorrect numbers, you'll want to submit a deletion request to support@brytsoftware.com so we can clear those for you. We usually suggest clearing all stored accounts so you can start with a clean slate.
Finish by clicking "Save".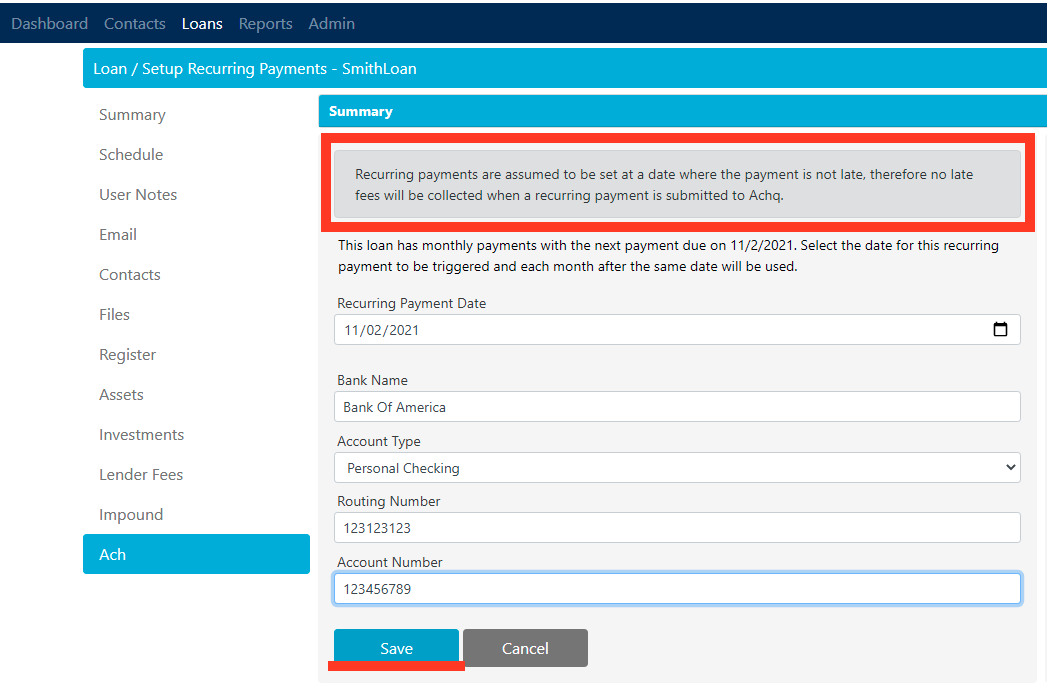
- Once the recurring payment form has been submitted, the loan's ACH tab will list any upcoming payments due within 30 days. You can schedule these payments to process with ACHQ by selecting the "Schedule with Achq" button.
.png) Note: Before scheduling the upcoming payment, notice the Recurring Payments section of the Dashboard, this way you'll get an overview of all loans with the recurring payments option enabled.
Note: Before scheduling the upcoming payment, notice the Recurring Payments section of the Dashboard, this way you'll get an overview of all loans with the recurring payments option enabled.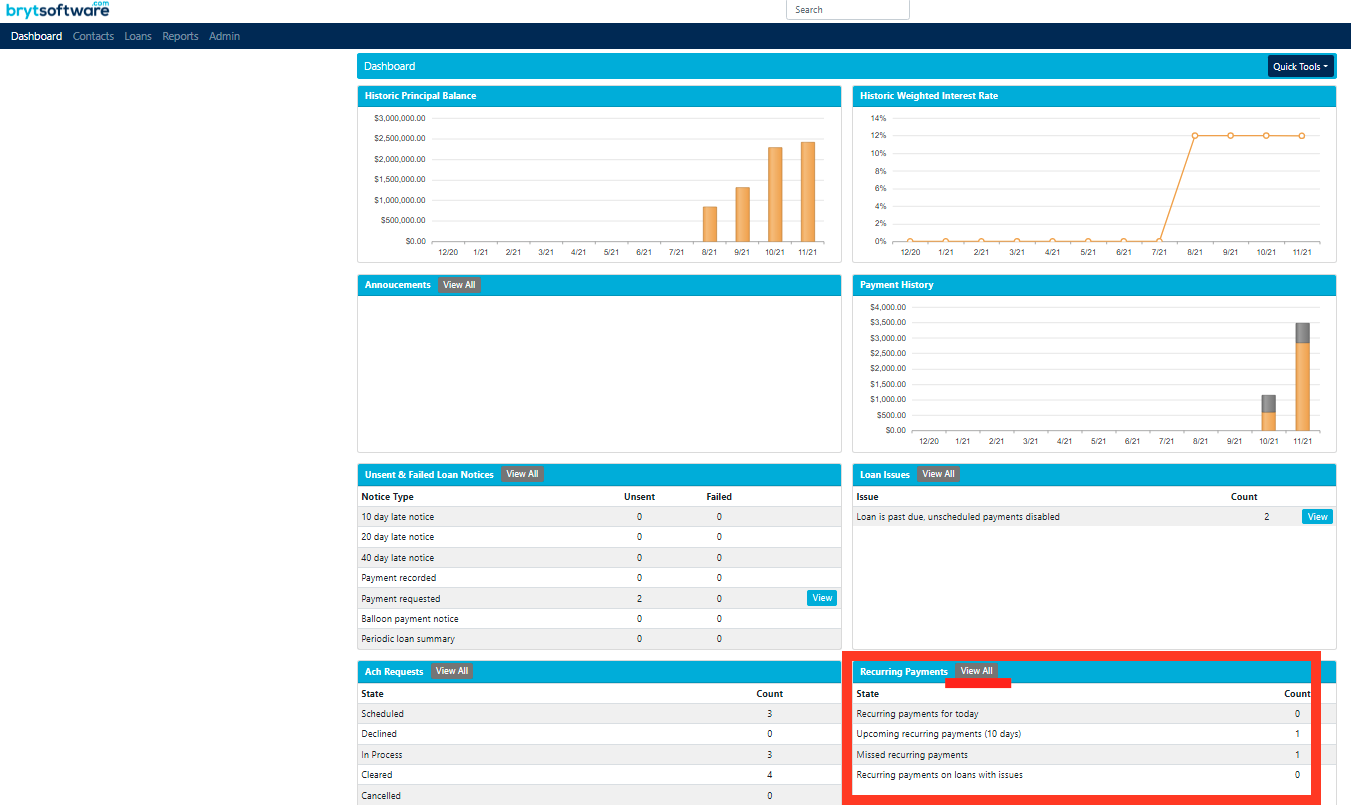 Selecting "View All" will redirect you to a list of loans with Achq payments ready to be scheduled.
- To schedule an Ach payment, there are two options.
1) Individual Loan's ACH tab - On a per-loan basis, you would go to the loan's ACH tab, then click the "Schedule with Achq" button (next to the payment under the "Current or Upcoming Recurring Payments").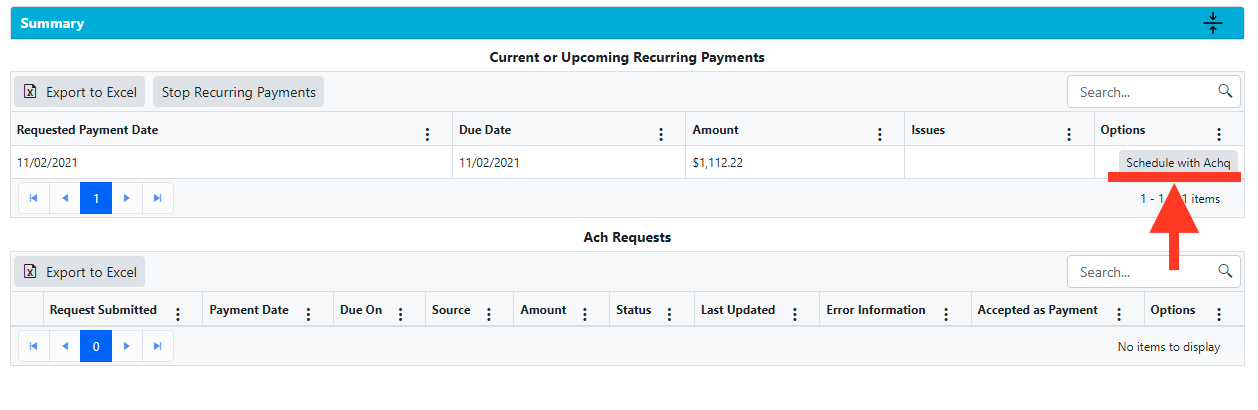 2) Recurring Payments (Dashboard Widget) - this widget will show all loans you've enabled the 'Recurring Payments' option for.
You'll be able to Schedule ACH payment three ways here:
1. Click an individual loan's 'Schedule with ACHQ' button on the far-right 'Options' column.
2. Click the 'Process All Current Payments' button, which will schedule payments for every loan currently on the Recurring Payments widget list.
3. Click and select/group individual loans you'd like to process, then use the 'Process Selected Payments' button to only schedule payments for those you've individually selected on theRecurring Payments widget list.
To click and select/group loans, you'll want to use the Command/CMD button on a Mac and select each loan, while on Windows it's the Control/CTRL key and selects each loan. You can also start by selecting a bigger grouping of loans by using the Shift key and clicking to select a sequence of loans, this way it's a bit faster. To learn more about this payment recording process, please review the 'Due Payments' widget.
Note: For the second and third ACH processing button options, the selected grouping of payments will undergo a queued payment process, do your best to stay on the payment page until it finishes the recording process. Otherwise, it may break the recording process and our development team would need to correct those loans. If it gets stuck, please let us know so we can assist you.


 If this is the case, click the "here" hyperlink which redirects you to the ACH setup page under the Admin options. Follow the steps provided in
 Note: Business checking accounts must include an Organization value.

.png) Note: Before scheduling the upcoming payment, notice the Recurring Payments section of the Dashboard, this way you'll get an overview of all loans with the recurring payments option enabled.
Note: Before scheduling the upcoming payment, notice the Recurring Payments section of the Dashboard, this way you'll get an overview of all loans with the recurring payments option enabled. Selecting "View All" will redirect you to a list of loans with Achq payments ready to be scheduled.
 2) Recurring Payments (Dashboard Widget) - this widget will show all loans you've enabled the 'Recurring Payments' option for.
 7. Reviewing ACH Payments and Addressing ACH Payment Issues
For both ACH scheduling options (Individual or via the widget), when you go to the Loan's Ach tab, notice how the "Accepted as Payment" column is reflected as "Yes" (after you've scheduled a payment).

Note: See ACH Transaction Processing for more information regarding ACH statuses (the Scheduled Payment's Status column.).
The scheduled ACH payment is automatically recorded as part of the Loan's schedule as paid.

Note: If the ACH payment returns any status other than 'Cleared', which indicates a successful ACH transaction - you'll want to go to the loan's ACH tab and refer to the far-right Options column to NSF (Guide) or Delete the ACH payment (Guide). If this happens and you need to NSF or delete a recorded payment, you'll need to 'Stop Recurring Payments'. Once the affected pay period's payment issues are corrected, you can then re-enable the loan for recurring payments. This recurring payments option works best with future-oriented dues and successful payments, you'll need to 'Stop Recurring Payments' to reconcile any payment issues.
Lastly, you can get more details about the Ach transaction by clicking the "Ach" button on the schedule of the loan.

This concludes the Recurring Payments setup process.
Additional Information for Steps Outlined Above
Step 4) For the 'Recurring Payment Date' option, you may select the ACH payment's processing date before the loan's due date if you prefer (provided that the selected 'Recurring Payment Date' has not already passed). Some servicers like to schedule collections early to allow for the 3-5 day ACH processing time. You can also select a date after a loan's recurring due dates if you'd prefer. The selected date will set the ACH payment to initiate the draw on that date.
For example, if today's date is 5/1/24 and a loan has a 7/1/24 due date, but you've scheduled this recurring payment date for 6/15/24, then the loan's recurring collecting date will be the 15th of each month, despite the loan's due dates being the first of each month. Following the 6/15/24 processing date example, the 'Schedule with ACHQ' button will only appear 30 days before the loan's due date, so on 6/1/24, if scheduled, it will initiate the 3-5 day processing time for that payment and record 6/15/24 as the pay period's Paid On date.
At any time, only one pay period will be shown per loan for recurring payments, once you schedule the first period, you can schedule more if that's applicable (for loans with payment frequencies due sooner than 30 days).
Recurring ACH Button Options
There are a total of 5 buttons to help distinguish late fees and payoff scenarios.
1. Schedule with Achq - Normal expected button to be used to schedule an ACH payment prior to a loan's late state. This will allow you to schedule days in advance, the day of the loan's dues, or within the loan's grace period prior to being late.
2. Go to Loan Summary / Schedule ACH with late fee - when this happens, this is due to a loan's payment being late. You have two button options appear, 1) Go to Loan Summary and 2) Schedule ACH with late fee. The first option is provided for you to easier navigate to the loan for review, while the second option is to process the payment via ACH with the late fee.
The new message under the Issues column notes 'Loan is Late, disable recurring and use the ACH payment link to waive the late fee'. This update allows you to process with late, or if you'd like to waive the late fee then you can do so by disabling recurring payments first (using the Go to Loan Summary --> then going to the loan's ACH tab and clicking the 'Stop Recurring Payments' button) then using the 'Go to Payment Link' for you as the lender to have the ability to waive the late fee on the ACH payment submission page.
3. Payoff with Achq - this button option appears when the loan has reached its final pay period, however, it will only be available if it meets certain criteria. The criteria are: no outstanding dues and the final scheduled payment amount fully pays off the principal balance while not having a balloon payment.
You can attempt to process a balloon payment but you'll need to provide borrower-provided consent/authorization to ACHQ and ACHQ will let you know if they'll allow the larger than normally expected amount to be processed. ACHQ should also let you know of any limits that may conflict with this since there are per-transaction and monthly limits set by ACHQ compliance. You'll want to get in contact with ACHQ either via support@achq.com or compliance@achq.com.
4. Payoff ACH with late fee - this button option will appear when all criteria from above are met and include a late fee to be processed. Again, you'll want to check in with ACHQ to determine if you'll be able to process a larger-than-normal payment.

